
Hello there :-)
This blogpost shall be dedicated to the person called "duckzie" who requested for cookies with icing on my tagbox. Well, you're the first person who has ever requested me to make something on this blog so I shall. It is actually quite exciting when people throw me challenges but I'm so sorry that this recipe came so late - there were too many things happening in my life (which I'm fortunate for) but here it is, 12 days later! Hopefully you'll still give it a try!

I've made these cookies before, last year around Christmas time so it was quite appropriate to make these sugar cookies again this year during the holiday/ festive period. My mum really loved them last year so I hope she'll like this batch as well! It's really just a plain sugar cookie with royal icing (royal icing sounds grand and difficult to make but it's the easiest icing to make and work with ever - don't worry) So here's the recipe for:
SUGAR COOKIES WITH ROYAL ICING

Ingredients:
1. 475g flour
2. 1/2 teaspoon baking powder
3. 1/4 teaspoon salt
4. 120g unsalted butter
5. 240g sugar
6. 1 large egg
7. 1 teaspoon vanilla extract
For the royal icing:
1. 2 large egg whites
2. 2 teaspoon vanilla extract
3. 330g icing sugar
4. Colouring (if desired)
5. Sprinkles/ edible decorations (if desired)
Some simple tools you'll need are cookie cutters, rolling pin, non-stick baking paper and plastic/ piping bags
For the cookies itself:
1. Mix the flour, baking powder and salt together and set aside

2. In a large bowl, cream the softened butter and sugar together

Creaming basically means whisking and combining them until well-combined. The mixture should be slightly pale and fluffy.

3. Add your egg and vanilla extract and mix well


5. It should form a dough like consistency and transfer it to a sheet of non-stick baking paper, wrap it with the paper and refrigerate the dough for at least an hour.

6. When you're ready to roll out your dough, preheat your oven to 175 degree Celcius
7. Retrieve your dough from the fridge and let it warm up just a bit so that it's malleable and roll it out flat

8. Cut out your lovely shapes with your cookie cutters - it's really fun!

9. Transfer your cookie shapes onto a baking tray lined with baking paper
10. Send it to the oven for 10-15 minutes or until the sides get slightly brown. Remember to rotate the tray halfway through the baking process to ensure even baking.

11. Gather the scrap pieces of dough, wrap it up and pop it back into the fridge to set before taking it out and cutting out more cookie shapes to send into the oven once the first batch is done.

12. Get your cookies from the oven when they're done baking.

13. Transfer them to a cooling rack to cool down while waiting for their counterparts to bake

For the royal icing:
(note: I made only half the icing recipe - i.e. 1 egg white instead of 2 - because my family absolutely hates sweet and sugary things and prefer the cookies plain and not iced. I like them iced though heh)
1. Sift the icing sugar

2. Add the vanilla extract into the egg whites

3. Beat the egg whites and vanilla extract until frothy

At first I was a bit afraid that the browns of the vanilla extract would make my icing brown instead of white but it turned out fine in the end.
4. Add the icing sugar in parts, beating well after every addition

5. The royal icing should be quite thick, as pictured. Add more icing sugar to thicken it or thin it down with milk/ water.

6. Transfer the icing into plastic/ piping bags and separate to colour the icing (if desired). As it is a small amount, I couldn't be bothered to waste piping bags!

7. Use liquid/ gel food colouring to colour your icing. I used a small amount as I wanted a pastel effect.


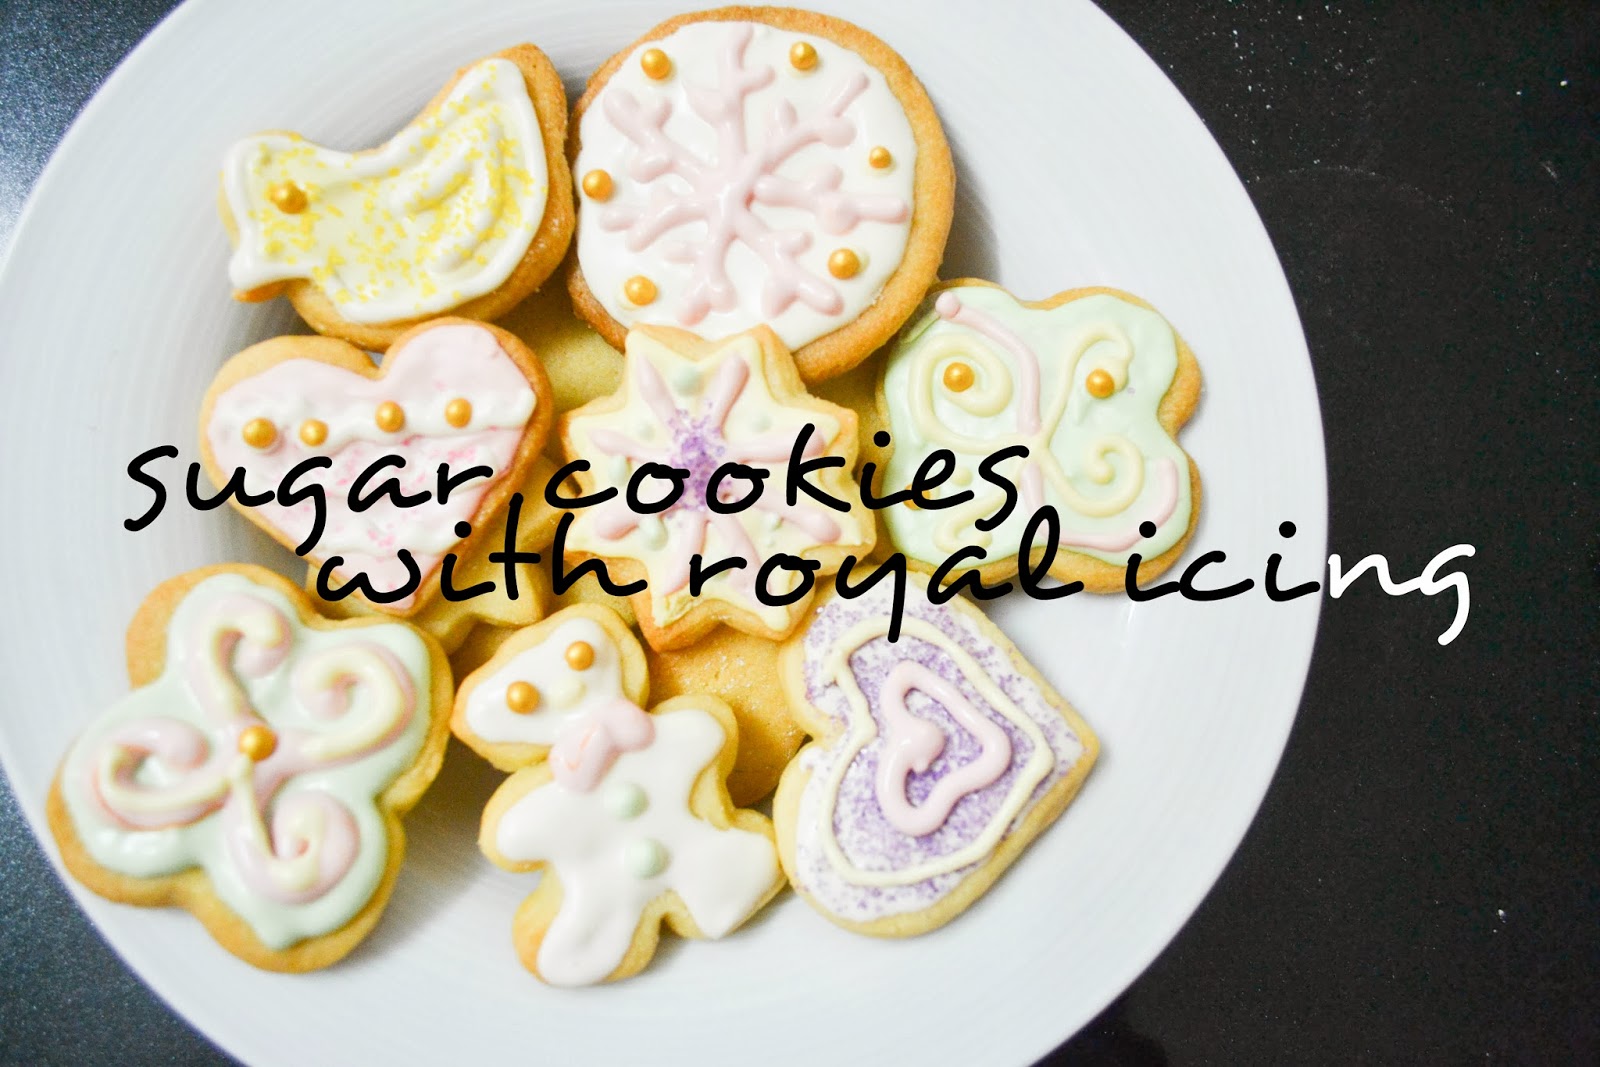
Decided on white, yellow, green and pink colours!
8. Go to town with your icing! Let your imagination flow :-)

I flooded all my cookies first (flooding means covering the whole surface with icing, first by outlining before filling it in)

I waited for the first layer to dry before adding on designs :-)

Used edible golden beads

Colourful sugars work really well too!
And there you have it - sugar cookies iced with royal icing! :-) Icing cookies take a bit of patience if you want the end result to be pretty and I was actually quite pleased with the designs I managed to come up with. They looked quite festive and I attempted some Christmas-themed ones like the pink snowflake!

There are really so many things you can do with royal icing - it's actually one of few icings that don't give me a lot of trouble and offer great control! If you head over to YouTube, there are many people who make incredible looking cookie art and all of them looks so beautiful. However, some people aren't very comfortable with the raw egg whites in the royal icing - I'm perfectly okay with them. I feel like there's a problem with raw egg yolks but egg whites are fine; they make the icing so glossy and lovely. But if you really don't like it, there are some royal icing recipes that use meringue powder instead - maybe that'll be a better alternative.

Have fun! :-)
No comments
Post a Comment